This article describes how to install Oracle 12c 64bit database on Ubuntu 16.04 64bit.
Download the Oracle software from OTN or MOS or get a downloaded zip file.
You should have following two files downloaded now.
Unzip and copy them to
NOTE: you might have to merge two unzipped folders to create a single folder.
Now create the oracle user
(mine is oracle)
Now execute this script to install all required packages.
Open hosts file
It should have a record similar to following
Test the x server
If you see a clock running you are good to go
Now run
Result should be
Now let oracle user to access xhost
Linking Binaries
Linking Libraries
Open
Add to the end of the file
Login as Oracle
Edit .bashrc file
Insert:
Load the New Kernel Parameters.
Load New .bashrc Settings
Installation
--next

As the Ubuntu isn't a OS supported by oracle this error occurs, click yes.

Installation options
--create and configure db
--next

system class
--server class
--next

Grid installation options
--single instance
--next

Install type
--advance install
--next

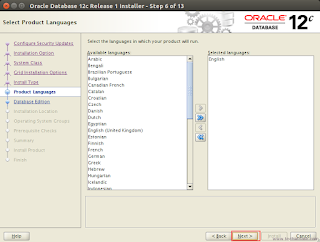
Product languages
--engish
--next
Database edition
--standard edition one
--next
Installation location
--no change
--ORACCLE_BASE /u01/app/oracle
--software location /u01/app/oracle/product/12/dbhome_1
--next

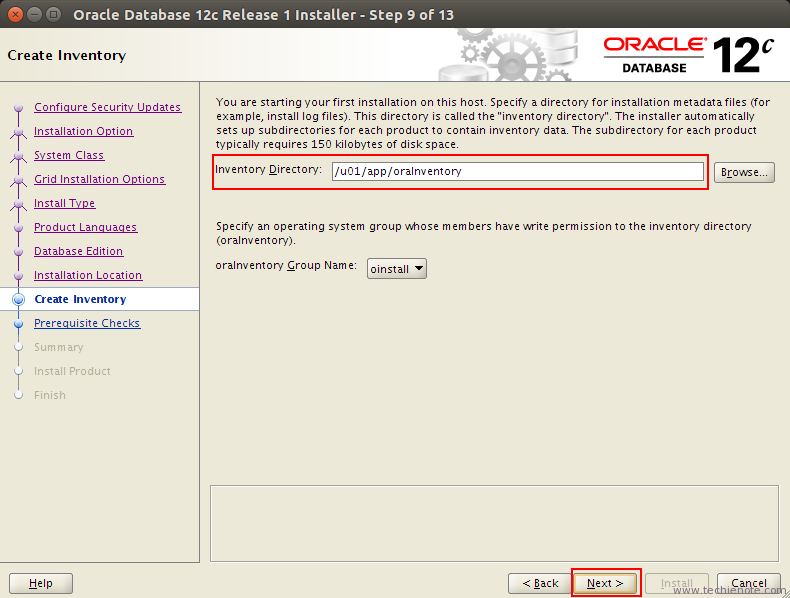
Create inventory
--no change
--inventry directory /u01/app/oraInventory
--next

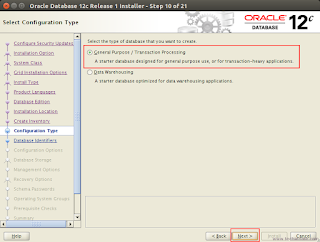
Configuration type
--no change
--general purpose
--next
Database identifier
--note
--global database name - orcl
--oracle system identifier SID - SID
--unchecked Create as Container database option
--next

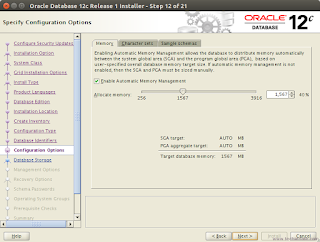
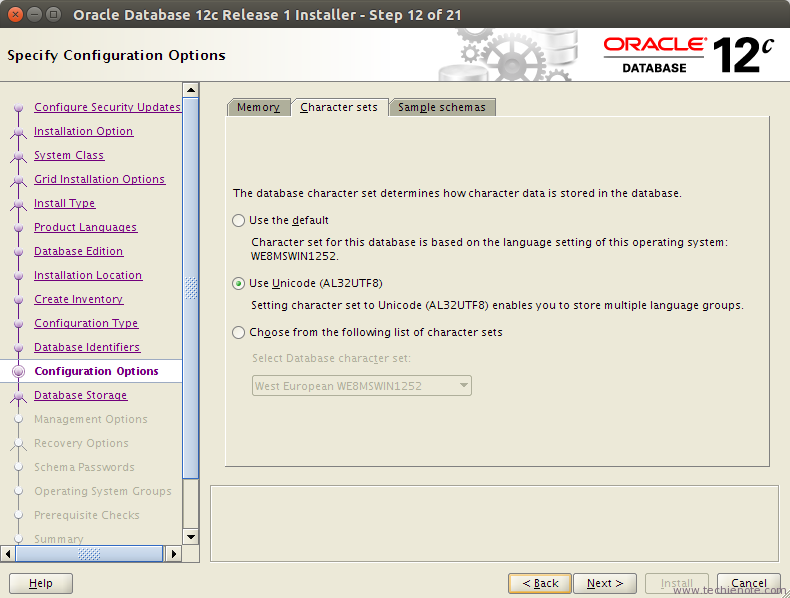
Configuration options
--note
-- Enable Automatic Memory Management: TRUE
--defoult charset
--next

Database storage
--note
--database file location - /u01/app/oracle/oradata
Management options
--next

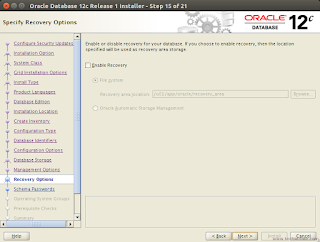
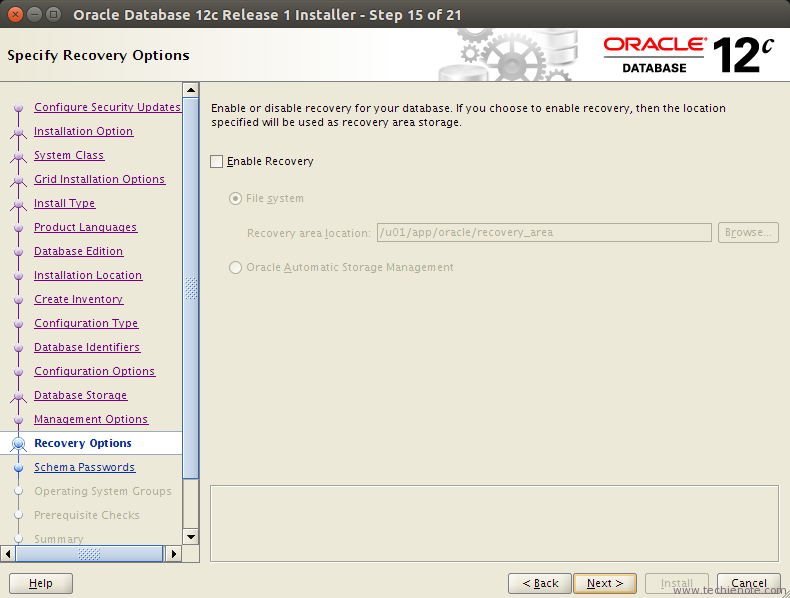
Recovery options
--next
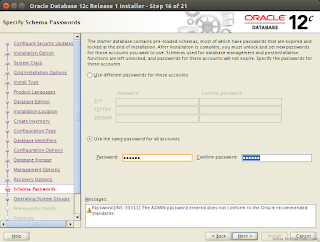
Specify schema passwords
--select : Use the same password for all accounts
--SYS,SYSTEM,DBSNMP
--PWD: nuwan
--next

Privileged operating groups
--next

Summary
-- save response file
--install


Once you clicked on install button real installation begins. After this point you expect a lot of errors can't ignore. When you see a error message don't abort or skip, just refer the troubleshooting section.
NOTE: make sure you do all these changes in a new terminal.
#in a new terminal
#rename
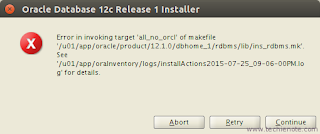
Issue: ins_net_server.mk
# change
Issue: Error in invoking target 'install' of makefile '/u01/app/oracle/product/12/dbhome_1/network/lib/ins_net_server.mk'.
Finally we have finished all the linking errors.
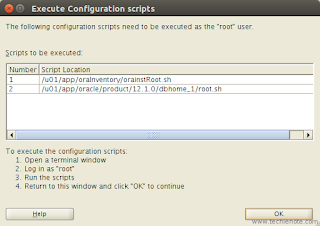
Now as per the instructions run the following commands with root / root equivalent user:
Copying oraenv to /usr/local/bin ...
Copying coraenv to /usr/local/bin ...
--/etc/oratab file
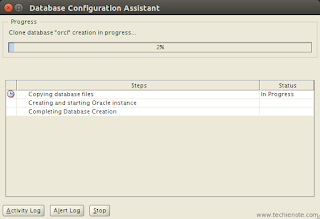
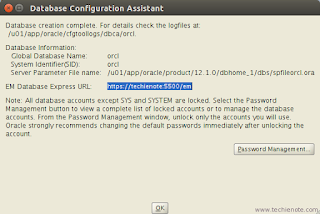
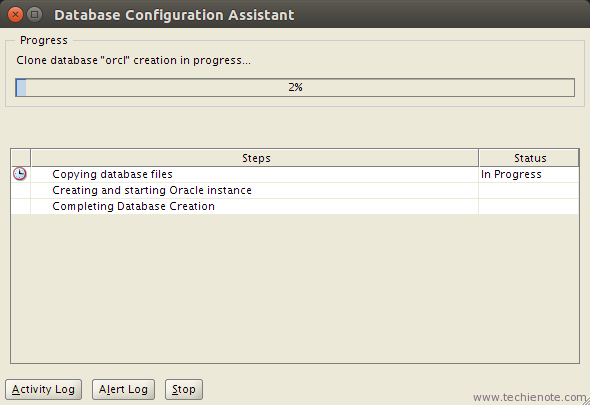
Database Configuration
--wait till end
--EM Database Express URL - https://127.0.0.1:5500/em
--server parameter file - spfileOraSID.ora
--ok
Set single password for all
sys system dbsnmp
(mine is nuwan)

To start listener run following as oracle user
To start database run following
Start em
https://127.0.0.1:5500/em

Login to em
I can log in as
user sys
pwd nuwan
If you can logged into the system successfully
Yes we have completed the installation successfully.
Download software
Download the Oracle software from OTN or MOS or get a downloaded zip file.
- OTN: Oracle Database 12c Release 1 (12.1.0.2) Software (64-bit).
- edelivery: Oracle Database 12c Release 1 (12.1.0.2) Software (64-bit)
Unpacking
You should have following two files downloaded now.
linuxamd64_12102_database_1of2.zip
linuxamd64_12102_database_2of2.zip
linuxamd64_12102_database_2of2.zip
Unzip and copy them to
\tmp\databases
NOTE: you might have to merge two unzipped folders to create a single folder.
Create new groups and users
Open a terminal and execute following commands. you might need root permission.
groupadd -g 502 oinstall
groupadd -g 503 dba
groupadd -g 504 oper
groupadd -g 505 asmadmin
groupadd -g 503 dba
groupadd -g 504 oper
groupadd -g 505 asmadmin
Now create the oracle user
useradd -u 502 -g oinstall -G dba,asmadmin,oper -s /bin/bash -m oracle
You will prompt to set to password. set a momorable password and write it down.(mine is oracle)
Install required packages
Lets set Ubuntu Extra Packages Repo for
- libpthread-stubs0
- libmotif4
- libtiffxx5
echo 'deb http://cz.archive.ubuntu.com/ubuntu precise main universe' >> /etc/apt/sources.list.d/extra.list
apt-get update
apt-get update
Now execute this script to install all required packages.
apt-get install alien autoconf automake autotools-dev binutils doxygen \
elfutils expat gawk gcc gcc-multilib g++-multilib libstdc++6:i386 ksh less libtiff5 \
libtiff5-dev lib32z1 libaio1 libaio-dev libc6-dev libc6-dev-i386 libc6-i386 \
libelf-dev libltdl-dev libmotif4 libodbcinstq4-1 libodbcinstq4-1:i386 \
libpthread-stubs0 libpth-dev libstdc++5 lsb-cxx make \
pdksh openssh-server rlwrap rpm sysstat unixodbc unixodbc-dev x11-utils \
zlibc libglapi-mesa:i386 libglu1-mesa:i386 libqt4-opengl:i386 \
libpthread-workqueue0 libpthread-workqueue-dev libzthread-2.3-2 libzthread-dev \
libpthread-stubs0-dev libaio-dev
DB Directory Permissions
Lets set oinstall group to access oracle installation.
chown -R oracle:oinstall /tmp/database
Host file
Host file should contain the fully qualified name for the local server.Open hosts file
cat /etc/hosts
It should have a record similar to following
127.0.0.1 localhost
Grant Connection to X Server
You need this step to load installation UI as oracle userTest the x server
xclock
If you see a clock running you are good to go
Now run
xhost
Result should be
xhost SI:localuser:nuwan
(nuwan is my user name)
(nuwan is my user name)
Now let oracle user to access xhost
xhost +SI:localuser:oracle
Symlinks to Binaries and Libraries
Linking Binaries
ln -s /usr/bin/awk /bin/awk
ln -s /usr/bin/rpm /bin/rpm
ln -s /usr/bin/basename /bin/basename
ln -s /usr/bin/rpm /bin/rpm
ln -s /usr/bin/basename /bin/basename
Linking Libraries
ln -s /usr/lib/x86_64-linux-gnu /usr/lib64
cd /lib64
ln -s /lib/x86_64-linux-gnu/libgcc_s.so.1 .
cd /lib64
ln -s /lib/x86_64-linux-gnu/libgcc_s.so.1 .
Make Target Directories
mkdir -p /u01/app/oracle/product/12/dbhome_1
chown -R oracle:oinstall /u01
chmod -R 775 /u01
chown -R oracle:oinstall /u01
chmod -R 775 /u01
Setup configuration parameters
Add Oracle 12c Kernel Parameters
Open
nano /etc/sysctl.conf
Add to the end of the file
#### Oracle 12c Kernel Parameters ####
fs.suid_dumpable = 1
fs.aio-max-nr = 1048576
fs.file-max = 6815744
kernel.shmall = 2097152
kernel.shmmax = 536870912
kernel.shmmni = 4096
# semaphores: semmsl, semmns, semopm, semmni
kernel.sem = 250 32000 100 128
net.ipv4.ip_local_port_range = 9000 65500
net.core.rmem_default=4194304
net.core.rmem_max=4194304
net.core.wmem_default=262144
net.core.wmem_max=1048586
Oracle User Settings 4 Oracle 12c
nano /etc/security/limits.conf
#Add the following lines
#### oracle User Settings 4 Oracle 12c ####
oracle soft nproc 2047
oracle hard nproc 16384
oracle soft nofile 1024
oracle hard nofile 65536
oracle soft stack 10240
#Add the following lines
#### oracle User Settings 4 Oracle 12c ####
oracle soft nproc 2047
oracle hard nproc 16384
oracle soft nofile 1024
oracle hard nofile 65536
oracle soft stack 10240
Add Paths to oracle’s .bashrc
Login as Oracle
su oracle
Edit .bashrc file
nano ~/.bashrc
Insert:
# Oracle Settings
TMP=/tmp;
export TMP TMPDIR=$TMP;
export TMPDIR ORACLE_HOSTNAME=127.0.0.1;
export ORACLE_HOSTNAME
ORACLE_UNQNAME=DB12C;
export ORACLE_UNQNAME
ORACLE_BASE=/u01/app/oracle;
export ORACLE_BASE
ORACLE_HOME=$ORACLE_BASE/product/12/dbhome_1;
export ORACLE_HOME
ORACLE_SID=SID;
export ORACLE_SID
PATH=/usr/sbin:$PATH;
export PATH
PATH=$ORACLE_HOME/bin:$PATH;
export PATH
LD_LIBRARY_PATH=$ORACLE_HOME/lib:/lib:/usr/lib:/usr/lib64;
export LD_LIBRARY_PATH
CLASSPATH=$ORACLE_HOME/jlib:$ORACLE_HOME/rdbms/jlib;
export CLASSPATH
Installation
Load the New Kernel Parameters.
/sbin/sysctl -p
Load New .bashrc Settings
source ~/.bashrc
Installation
chmod -R +x /tmp/database
/tmp/database/runInstaller
/tmp/database/runInstaller
UI Steps
Configure Security Updates--next


As the Ubuntu isn't a OS supported by oracle this error occurs, click yes.

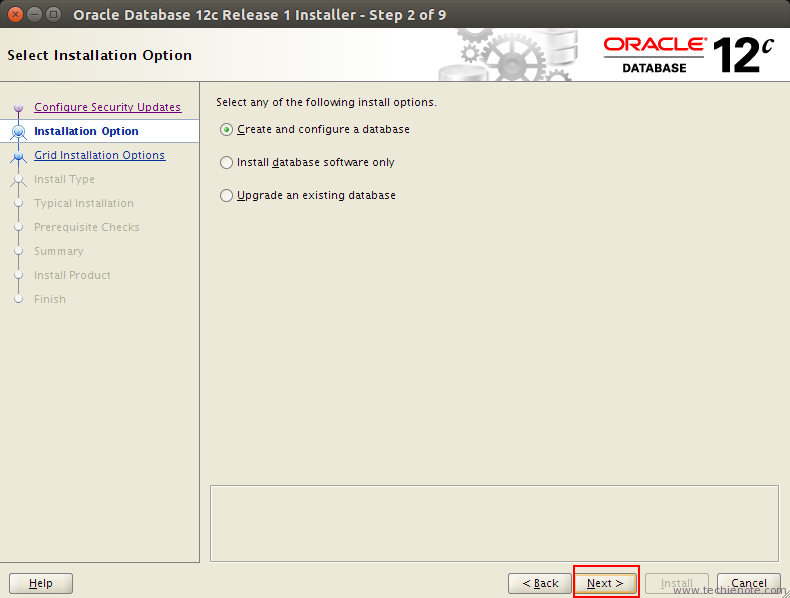
Installation options
--create and configure db
--next
system class
--server class
--next

Grid installation options
--single instance
--next

Install type
--advance install
--next

Product languages
--engish
--next

Database edition
--standard edition one
--next
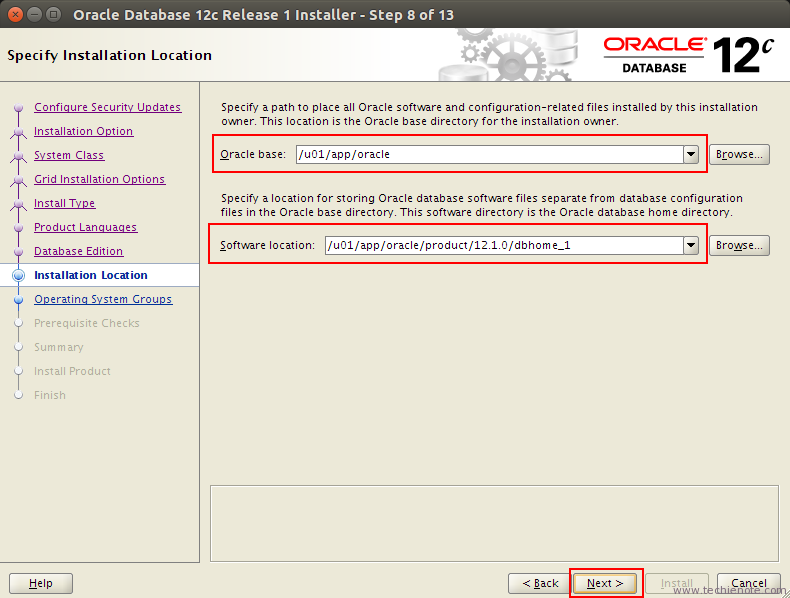
Installation location
--no change
--ORACCLE_BASE /u01/app/oracle
--software location /u01/app/oracle/product/12/dbhome_1
--next
Create inventory
--no change
--inventry directory /u01/app/oraInventory
--next
Configuration type
--no change
--general purpose
--next

Database identifier
--note
--global database name - orcl
--oracle system identifier SID - SID
--unchecked Create as Container database option
--next

Configuration options
--note
-- Enable Automatic Memory Management: TRUE
--defoult charset
--next

Database storage
--note
--database file location - /u01/app/oracle/oradata
Management options
--next

Recovery options
--next
Specify schema passwords
--select : Use the same password for all accounts
--SYS,SYSTEM,DBSNMP
--PWD: nuwan
--next


Privileged operating groups
--next

Summary
-- save response file
--install

Installation Begins

Once you clicked on install button real installation begins. After this point you expect a lot of errors can't ignore. When you see a error message don't abort or skip, just refer the troubleshooting section.

NOTE: make sure you do all these changes in a new terminal.
Troubleshooting
Issue: links proc gen_pcscfg procob issue#in a new terminal
su oracle
rm -rf $ORACLE_HOME/lib/stubs/
nano $ORACLE_HOME/rdbms/lib/env_rdbms.mk
rm -rf $ORACLE_HOME/lib/stubs/
nano $ORACLE_HOME/rdbms/lib/env_rdbms.mk
#rename
LINKTTLIBS=$(LLIBCLNTSH) $(ORACLETTLIBS) $(LINKLDLIBS)
LINK=$(FORT_CMD) $(PURECMDS) $(ORALD) $(LDFLAGS) $(COMPSOBJS)
LINK32=$(FORT_CMD) $(PURECMDS) $(ORALD) $(LDFLAGS32) $(COMPSOBJS)
TG4PWD_LINKLINE= $(LINK) $(OPT) $(TG4PWDMAI) \
$(LLIBTHREAD) $(LLIBCLNTSH) $(LINKLDLIBS)
RMAN_LINKLINE=$(LINK) $(OPT) $(S0MAIN) $(SSKRMED) $(SKRMPT) \
$(LLIBDBTOOLS) $(LLIBCLIENT) $(LLIBSQL) $(LLIBPLSQL) \
$(LLIBSNLSRTL) $(LLIBUNLSRTL) $(LLIBNLSRTL) \
$(LLIBSLAX) $(LLIBPLSQL) $(LIBPLCN) $(LINKTTLIBS)
#to
LINKTTLIBS=$(LLIBCLNTSH) $(ORACLETTLIBS) $(LINKLDLIBS) -lons
LINK=$(FORT_CMD) $(PURECMDS) $(ORALD) $(LDFLAGS) $(COMPSOBJS) -Wl,--no-as-needed
LINK32=$(FORT_CMD) $(PURECMDS) $(ORALD) $(LDFLAGS32) $(COMPSOBJS) -Wl,--no-as-needed
TG4PWD_LINKLINE= $(LINK) $(OPT) $(TG4PWDMAI) \
$(LLIBTHREAD) $(LLIBCLNTSH) $(LINKLDLIBS) -lnnz12
RMAN_LINKLINE=$(LINK) $(OPT) $(S0MAIN) $(SSKRMED) $(SKRMPT) \
$(LLIBDBTOOLS) $(LLIBCLIENT) $(LLIBSQL) $(LLIBPLSQL) \
$(LLIBSNLSRTL) $(LLIBUNLSRTL) $(LLIBNLSRTL) \
$(LLIBSLAX) $(LLIBPLSQL) $(LIBPLCN) $(LINKTTLIBS) -lons
Issue: ins_net_server.mk
nano /u01/app/oracle/product/12/dbhome_1/network/lib/ins_net_server.mk
# change
tnslsnr: $(S0NSGL) $(SNSGLP) $(NSGLPNP)
$(SILENT)$(ECHO) " - Linking $(TNSLSNR)"
$(RMF) $@
$(TNSLSNR_LINKLINE)
# to$(SILENT)$(ECHO) " - Linking $(TNSLSNR)"
$(RMF) $@
$(TNSLSNR_LINKLINE)
tnslsnr: $(S0NSGL) $(SNSGLP) $(NSGLPNP)
$(SILENT)$(ECHO) " - Linking $(TNSLSNR)"
$(RMF) $@
$(TNSLSNR_LINKLINE) -lnnz12 -lons
$(SILENT)$(ECHO) " - Linking $(TNSLSNR)"
$(RMF) $@
$(TNSLSNR_LINKLINE) -lnnz12 -lons
nano /u01/app/oracle/product/12/dbhome_1/rdbms/lib/ins_rdbms.mk
# change
$(ORAPWD_LINKLINE)
# to
$(ORAPWD_LINKLINE) -lnnz12
nano /u01/app/oracle/product/12/dbhome_1/rdbms/lib/env_rdbms.mk
# change
ORACLE_LINKLINE=$(ORACLE_LINKER) $(PL_FLAGS) $(ORAMAI) $(SSORED) $(TTCSOI) \
$(ORACLE_KERNEL_LIBS) $(LINKLDLIBS)
# to$(ORACLE_KERNEL_LIBS) $(LINKLDLIBS)
ORACLE_LINKLINE=$(ORACLE_LINKER) -Wl,--no-as-needed $(PL_FLAGS) $(ORAMAI) $(SSORED) $(TTCSOI) \
$(ORACLE_KERNEL_LIBS) $(LINKLDLIBS)
$(ORACLE_KERNEL_LIBS) $(LINKLDLIBS)
Issue: Error in invoking target 'install' of makefile '/u01/app/oracle/product/12/dbhome_1/network/lib/ins_net_server.mk'.
nano /u01/app/oracle/product/12/dbhome_1/network/lib/ins_net_server.mk
$(TNSLSNR_LINKLINE)
to
$(TNSLSNR_LINKLINE) -lnnz12 -lons
Installation Ends
Finally we have finished all the linking errors.
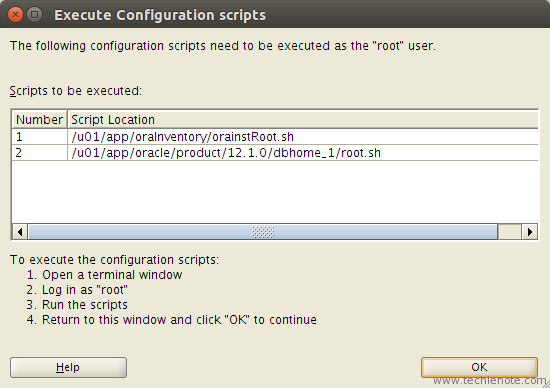
Now as per the instructions run the following commands with root / root equivalent user:
--/u01/app/oraInventory/orainstRoot.sh
--/u01/app/oracle/product/12/dbhome_1/root.sh
-- Copying dbhome to /usr/local/bin ...--/u01/app/oracle/product/12/dbhome_1/root.sh
Copying oraenv to /usr/local/bin ...
Copying coraenv to /usr/local/bin ...
--/etc/oratab file
Database Configuration
--wait till end
--EM Database Express URL - https://127.0.0.1:5500/em
--server parameter file - spfileOraSID.ora
--ok
Setting permission
On Database Configuration, there's a link to password management.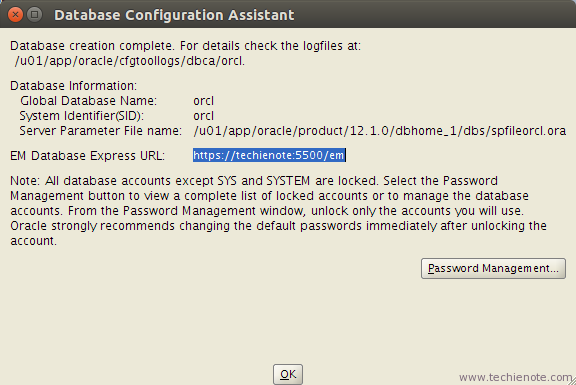
Set single password for all
sys system dbsnmp
(mine is nuwan)

Post Installation task
To start listener run following as oracle user
$ORACLE_HOME/bin/lsnrctl start
To start database run following
sqlplus /nolog
connect sys as sysdba
STARTUP;
EXIT;
connect sys as sysdba
STARTUP;
EXIT;
Done
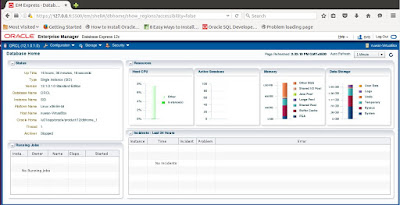
Start em
https://127.0.0.1:5500/em

Login to em
I can log in as
user sys
pwd nuwan

If you can logged into the system successfully
Yes we have completed the installation successfully.
it didnt prompt me to enter a password and now i need the password for Oracle user
ReplyDeleteBilal, a late reply. The same happened to me. You can change password for oracle user by using this command: sudo passwd oracle. It will prompt you to enter new password.
DeleteThe most effective method to Solve Oracle Database 12c Installation Issue through DB Installation Support
ReplyDeleteConfronting Oracle Database 12c Installation Issue? Not a major ordeal, Cognegic is the main organization that gives world-class answers for database establishment and database design. Our DB Installation and Configuration Support are in charge of execution and accessibility of our customer's most basic frameworks. Here clients will get DB Configuration Support and Database Management Services which is a well-disposed, accommodating and responsive administration.
For More Info: https://cognegicsystems.com/
Contact Number: 1-800-450-8670
Email Address- info@cognegicsystems.com
Company’s Address- 507 Copper Square Drive Bethel Connecticut (USA) 06801
Fix your Oracle Database Installation Issue with Remote DBA Services
ReplyDeletePrecisely when business development is principal and you require mission basic help, Oracle Advanced Customer Support Services passes on a gave empower gathering, proactive course, and affirmation associations. This mission basic help is gone on through the Oracle Solution Support Center, our most aggregate yearly help advantage offering over the whole Oracle IT stack - from applications, middleware, and database through servers, putting away, and structure gadgets.
Gets our Online Oracle DB Support or Database Administration for Oracle to decide your issues as for Oracle
For More Info: https://cognegicsystems.com/
Contact Number: 1-800-450-8670
Email Address- info@cognegicsystems.com
Company’s Address- 507 Copper Square Drive Bethel Connecticut (USA) 06801
How would I troubleshoot my Installation Issue through Cognegic's DB Installation Support?
ReplyDeleteAt Cognegic we ensure the secured and productive foundation of your entire database. We are ace in the foundation of different kind of databases including MySQL Database, Oracle database, MongoDB, Cassandra database, MS SQL Server and whatnot. Pick our first class DB Configuration Support and Database Management Services to decide your worry. We have profoundly gifted and confirmed specialized specialists who offer help and help 24*7. Cognegic's primary aphorism is to comprehend your issue by giving development bolster and to that reason we accessible all the time in your administration.
For More Info: https://cognegicsystems.com/
Contact Number: 1-800-450-8670
Email Address- info@cognegicsystems.com
Company’s Address- 507 Copper Square Drive Bethel Connecticut (USA) 06801
How does one install cloud control on ubuntu? I am trying to use oracle on ubuntu for self study. EM express does not have the admin features that DB control had. I believe cloud control does.
ReplyDeleteHi Nuwan! You are phenomenal. Thank you very much for the installation tutorial. It works! It helped me to install Oracle Database 12.1.0.2 Enterprise Edition on Linux Mint 18.3 Cinnamon 64-bit (based on Ubuntu 16.04).
ReplyDeleteSuch a nice blog, I really like what you write in this blog, I also have some relevant Information about Best HR Training In Hyderabad | Hr training institute in Hyderabad! if you want more information.
ReplyDeleteWorkday Online Training
Oracle Fusion HCM Online Training
Oracle Fusion SCM Online Training
Oracle Fusion Financials Online Training
I wish to show thanks to you just for bailing me out of this particular trouble. As a result of checking through the net and meeting techniques that were not productive, Same as your blog I found another one Oracle Fusion Product Hub.Actually I was looking for the same information on internet for Oracle PPM Cloud and came across your blog. I am impressed by the information that you have on this blog. Thanks once more for all the details.
ReplyDeleteThank you for the clear, step-by-step guide on installing Oracle Database 12c on Ubuntu 16.04. The practical tips and troubleshooting insights are especially helpful. For businesses needing expert support, GeoPITS stands out as a leading Oracle database managed services provider, ensuring smooth deployments, upgrades, and reliable performance.
ReplyDelete